Ok, so the latest project we're on is Architectural Representation. At its basic form its making card houses. we each got given a couple of sheets of paper with a building on. I got Alvar Aalto's Summer House (which is a real bas**d to do). The paper included a side view, or two, a plan view and a view of the contors around the house... or at least that's what I got.
At the moment I'm drawing the house out to scale in AutoCad, which is taking some time. Ive found a video someone took whilst visiting the house, which conveniently shows all sides of the house, so I'm working on adding them to the CAD drawing now.... no pics to add yet, sooooo yeah.
Tuesday, 5 January 2010
Still catching up....
Next Project was Simulation, we were given a describing word and an object and we had to make whatever we were given in a high quality. I managed to get "furry" and "park bench". So i made a furry park bench.
At first i thought of making a scale model, and that "fur" could be used loosely, as snow has a furry texture, as does mould. However these plans didn't last long and I ended up making a full size furry park bench, all be it, only a bit of it. I used MDF and red fur (red because it was cheap, and there wasn't enough purple to cover the bench :/ )
Below is the finished product: (I only needed to make enough of the bench to suit the photograph i wanted at the end)

Final Pic:

:D twas a fun project, comments on the final picture would be nice, i quite like it.... and theres no photoshop used at all, just natural light :)
At first i thought of making a scale model, and that "fur" could be used loosely, as snow has a furry texture, as does mould. However these plans didn't last long and I ended up making a full size furry park bench, all be it, only a bit of it. I used MDF and red fur (red because it was cheap, and there wasn't enough purple to cover the bench :/ )
Below is the finished product: (I only needed to make enough of the bench to suit the photograph i wanted at the end)
Final Pic:
:D twas a fun project, comments on the final picture would be nice, i quite like it.... and theres no photoshop used at all, just natural light :)
Oooops, catch up....
Wow, I've really not been on here in quite some time. Looking back at what I last put on here, there's not much that shows what I did with any of the research and lessons we were having at the time. So, at the end of the Vermeer project, I did successfully finish; fake bread, apples, plums, strawberries, and a model globe.
Cant remember how to do it now, but with any luck I'm going to upload pics of them all....
Fake Fruit (fake bread is in the background):

Don't seem to have a pic of the finished globe, but below is one of the globe, and then the stand (pics the wrong way round, but you get the idea), you'll just have to imagine them together:


Sunday, 18 October 2009
Prop Research
Globe Information
-c.-1668.jpg)
The 17th century was a time of dramatic discovery, a time when the charting of unexplored worlds was a dream shared by adventurers and traders but by geographers and astronomers as well.
As James Welu has noted, Hendrick Hondius' terrestrial globe, which rests on the cabinet in its four-legged stand, is turned to reveal the Indian Ocean which may be a note of national pride. This route was taken by the Dutch to reach China and Japan. The text within the decorative cartouche on the lower right-hand side of the globe (illegible in Vermeer's paintings) reads in part: "Since very frequent expeditions are started every day to all parts of the world, by which their positions are clearly seen and reported, I trust that it will not appear strange to anyone if this description of the globe differs very much from others previously published by us ...we ask the benevolent leader, that if he should have a more complete knowledge of some place, he willingly, communicate the same to us for the sake of increasing the public good." The same terrestrial globe appears in Vermeer's later Allegory of Faith but with a very different allegorical meaning.
Mapmaking in the Netherlands during the 1500s and 1600s is noted for its works of lavish decoration, particularly the cartes à figures, whose ornamental panels depicted figures, landscapes and possessions. Most of the period's maps and atlases were the work of family businesses.
Fruit Bowl Research

The bowel which holds the fruit was commonly called a klapmut.
As the market for imported Chinese porcelain grew exponentially, oriental dealers shaped their products according to European tastes and needs. One of the striking hybrids was a large soup dish called the klapmuts, which drew its name from the shape of a cheap, wool hat worn by the lower classes. The low flattened shape of the klapmuts allowed the European to dip his spoon in the bowl with ease and then rest it on the bowl's wide-brimmed border. The Chinese drank their broth soups directly from a bowl with steep vertical sides and had no use for the European version.
I will need a bowl like this to display my fruit in, this i will buy from a charity shop or indoor market.
Tuesday, 13 October 2009
Polstyrene Bread
Fake Bread
The first of our Tech Demos was using polystyrene to make bread. Polystyrene is a suitable material to use here as it can be easily cut to shape, is inexpensive and bread doesn’t have a lot of detail on it. Fine detail would be hard to achieve using expanded polystyrene; however it would be easier to do with polystyrene sheet.
To make the bread I started with a block of expanded polystyrene and drew on the rough shape of an old style loaf of bread. I cut out the shape on the ban saw, and then made the block round using rasps.
Once I was happy with the shape of the bread I used round files and rasps to create grooves in the top of the bread to give some detail and realism. Then using sand paper I smoothed out the polystyrene. Whilst doing this I made sure that I was only moving the sand paper in one direction, otherwise this would have caused more problems.
When I was happy with the final shape I applied a layer of muslin to the bread using PVA glue. During the demo there was an example for us to see, this was a lot smoother than the surface of my bread. To achieve this effect I am going to apply a second layer of muslin to my bread and then sand down the lumps.
After discussing this with my tutor I changed my plans:
It would be better to paint the bread first with 2 layers of thick white paint. This will give my bread an undercoat for the brown colour to come next. Also it will mean I can sand down the paint, rather than the muslin as this would become stringy and start to look worse than before.
After waiting for the first layer of muslin to dry I applied a second layer anyway. This will make the bread stronger and able to withstand handling more.
Once this had dried I applied the first coat of white emulsion paint. The image below shows the bread at this stage: As you can see I have placed the bread on a piece of softwood, this is to stop the bread getting stuck to the newspaper I’m using to protect my desk.

I applied 2 coats of brown paint to the bread after this. The brown I used came out slightly darker than I wanted, however I can say that it is brown bread and so the colour doesn’t matter. I have then painted a light grey colour onto the top of the bread, this is to give the effect of flour that is sometimes used on bread once its been baked.
Overall
Looking at my bread I think that it has gone well for a first attempt. It resembles what the style of bread should look like and I kept close to my original drawn out size. However it doesn’t look real. This could be due to the paint job I have done on it or the texture of the bread.
If I have the time I could redo the bread and spend more time on the muslin to prevent any lumps and wrinkles appearing. Also, whilst painting the bread I was going by imagination, it would be helpful to have a similar loaf of bread available to look at so that I can get the colours right.
Tuesday, 6 October 2009
Artists research
Harmen Steenwyck
Dutch painter of still life’s notably fruit. Steenwyck was born in delft in the year 1609 (unknown but worked out as an approximation from the time of his works), he died in 1656.
He worked in Lieden between 1628 and 1633 and then in Delft from 1633 to 1656.
He is best known for his painting “An allegory of the Vanities of Human Life” which is displayed at the national gallery, London.
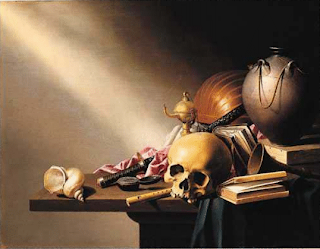
He was considered as Dutch “Vanitas” painter.
Vanitas paintings gave the message that you should not be concerned with the possessions you own in this life, as you cannot take them with you when you die. I would imagine this is symbolised in the paintings by the skull in each of his paintings. “vanities of Human life” has a skull as almost a centre piece in the picture. A skull being a symbol of death, someone has died for it to be there.
(Being a large object a skull could be made using polystyrene, following the same procedures as we did when making the bread. However it would be difficult to make the details of the skull such as the teeth and the eye sockets as polystyrene tends to flake. The other option is to make it using a cast resin. This is a procedure I’m not familiar with and I’ll need to look into this.)
Pieter De Hooch
Shared themes and style with Johannes Vermeer.
De Hooch was a genre painter during “the Dutch golden age”
De Hooch was born in Rotterdam and painted a total of 84 paintings.
One of his famous paintings is “The courtyard of a house in Delft”. Props in this image include an old fashion broom and a bucket that are sitting in the foreground of the picture
“Genre Painter” genre works are representations of scenes and events from everyday life, such as street scenes and domestic scenes. Vermeer’s painting “Young woman with a Water Pitcher”, which features in the film “ The girl with a pearl earring”.
The Dutch Golden Age was a period of time spanning the 17th century, during which Dutch trade, science and art were considered most acclaimed in the world.
Monday, 5 October 2009
Plaster Induction & Mask Making
Plaster Inductions
Release agents – Soft Soap – will come off easily
– Vaseline – will stay on mould and will be difficult to remove for reusing the mould.
You can not remove the original piece like you do with silicon moulds. The silicon flexes to allow the object out, plaster does not.
This means the mould will have to be in many sections, depending on the object.
When using plaster, you should try and avoid making hollow objects or doughnut shapes. A tyre would be hard to make as the plaster would set, shrinking in on the mould.
When making the mould you need a base board and walls. These can be board, laminated chipboard, fairly cheap to obtain.
Mask Making
Possible materials
Clay – cheap and you can make it into any shape you want. However it tends to dry up, so it needs to be kept moist to be worked into shape. Also it may crack once hardened, and if it is a thin surface then it could sage or break.
Plastacine & Plastaline – plastaline is a finer version of plastacine, is better in some ways but it is almost unworkable when cold. It is not as cheap as clay.
Chavant – is oil based non drying, unlike clay.. It also needs warming up or it can be cut into chinks, put in a tin foil lined box and heated with a spot lamp.
Super Sculpy – won’t dry out – won’t go hard, therefore it needs baking in the oven to hold its shape.
Art Mache – is very strong and gives good detail. It does take along time to dry, but this time can be used to add items or texture to the object you are making.
Clay Mask
A mould would need to be made first, alginate could be used to do this, then making a plaster mould from it. Once you have a mould clay needs to be applied to the mould in small amounts. This allows you to build up the mask in sections, giving you control of the thickness of the clay and the detail you want.
Use a spray bottle to keep the clay moist if you are working on the mask for a period of time.
Subscribe to:
Posts (Atom)
